How to add a solver#
Introduction#
In this article we will go through the process of adding a new Solver to the QCentroid Platform.
The process of creating a new solver involves six main steps:
- Choose the use case
- Register the solver in the platform
- Implement the solver using the solver template and store it in a Git repository
- Connect your repository to the platform
- Pull & build the new solver code into the platform
- Run a job in the platform with your solver
Pre-requisites#
First, there are some pre-requisites you need to have ready before creating a solver:
- Some developent tools installed:
- Python
- Pip
- Git
- virtualenv
- Development environment (IDE) such as Visual Studio Code
- Enable the SDKs you want to use from the SDKs section.
- Enable the harware providers you want to use from the Providers section.
- Choose a use case or create your own use case and get familiar with the input and ouput formats (JSON) of the use case, because your solver must be compliant with them.
Install Python#
Make sure Python is installed on your system. You can download it from the official Python website.
To check if Python is installed, run:
python --version
or
python3 --version
Install Pip#
Python’s package installer, pip, typically comes with Python installations. Verify if pip is installed by running:
pip --version
or
python3 -m pip --version
If pip is not installed, follow the installation instructions on the pip installation page.
Install Git#
You need git to clone repositories from GitHub. Download and install git from git-scm.com if it is not already installed.
Install virtualenv#
Install virtualenv using pip:
pip install virtualenv
Install Visual Studio code#
You need Visual Studio Code or your favorite IDE to develop your solver. Download and install Visual Studio Code from code.visualstudio.com/docs if it is not already installed.
Enable SDKs#
Go to the platform dashboard, and to the SDKs section, browse the list of available SDKs and enable the ones you will be using in your solvers.
Enable hardware providers#
Go to the platform dashboard, and to the Providers section, browse the list of available providers and enable the ones you will be using in your solvers.
In this step, you will be asked if you have your own access token for each provider and if you want to use it or if you prefer to use QCentroid tokens.
Choose the use case and familiarize yourself with the input/output format#
Browse the Use Cases section to see the use cases already created in your organization and the Use Cases catalog to see other use cases publicly available to develop solvers for them.
Once you have chosen the use case, or created your own use case, visit it and check the Tehcnical details section.
Here’s an example of the Max Cut use case input and output specification in JSON format:
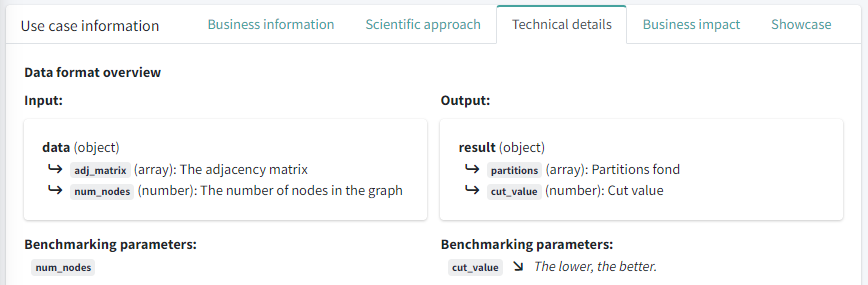
This would be an example of an input data file for the Max cut use case, following the input format:
{
    "adj_matrix": [ [0, 9, 5, 2, 4, 1],
                    [9, 0, 3, 8, 7, 6],
                    [5, 3, 0, 2, 8, 4],
                    [2, 8, 2, 0, 9, 3],
                    [4, 7, 8, 9, 0, 2],
                    [1, 6, 4, 3, 2, 0] ],
    "num_nodes": 6
}
And this would be an example of output data generated by a solver:
{
    "partitions": [1, 0, 1, 0, 1, 1, 0, 1, 0, 0],
    "cut_value": 147
}
1. Choose the Use Case#
The first step is to choose the use case to be solved.
In the Use cases section you can find all the use cases available on the platform.
You can also create your own use case if you don’t find any suitable one already created (check Create a use case for instructions).
For this tutorial we will assume that we want to solve the Max Cut problem (a classic optimization problem).
2. Register the solver in the platform#
Now, you can register your solver int the Platform.
To register a new solver in the platform:
- Go to the section My solvers through the left side menu
- Then, on the top-right corner, click on the Add new solver button
- You will get the solver creation wizzard where you can fill all the information of your solver:
- Select the use case you are solving.
- Fill in your solver details, such as name and description.
- Fill in the branch that you will use in your repository, usually
mainordevelop(you can change this later).
- Click the Add new solver button at the end of the wizzard to save the solver.
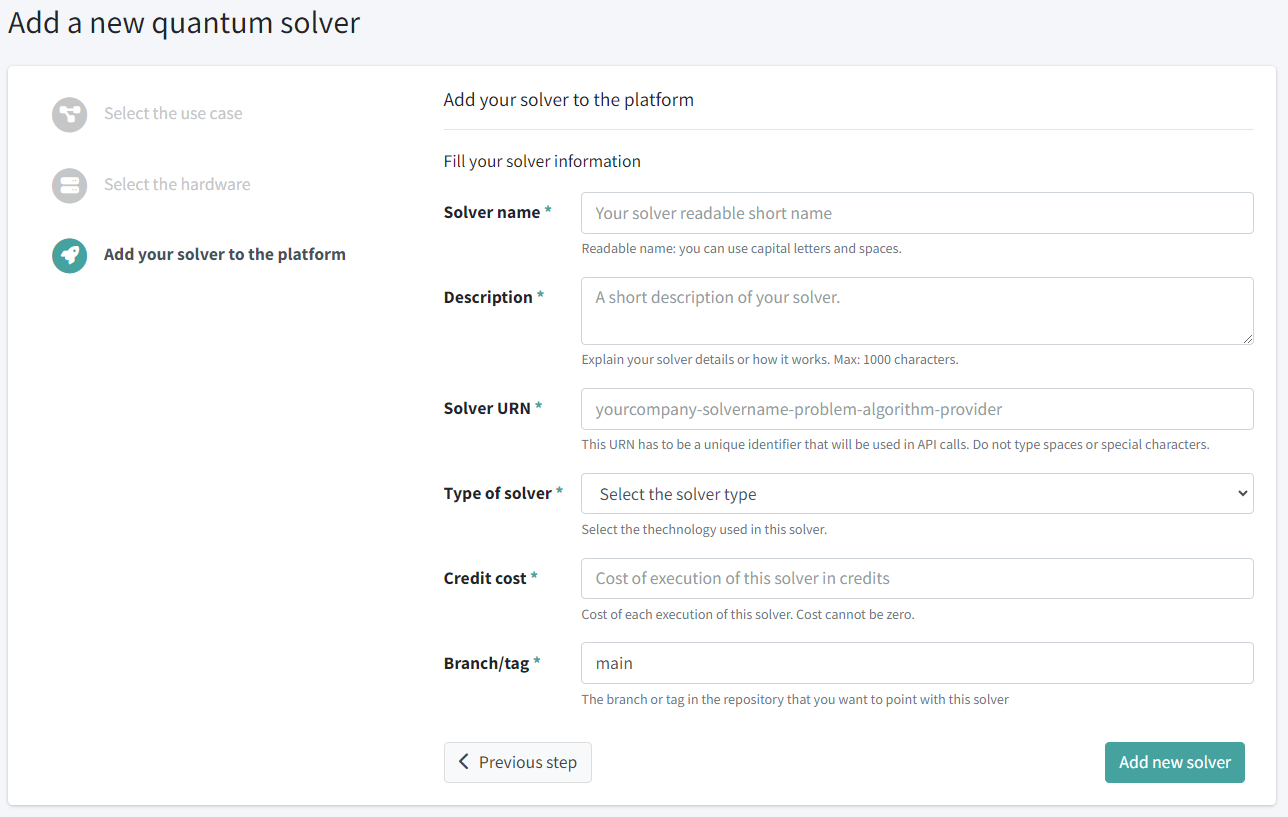
After this step is completed, you can start implementing the solver source code.
3. Implement the solver using the Solver Template#
Once the use case has been choosen and you have registered a solver in the platform, you can start implementing the actual source code of your solver.
Let’s see how we can implement the solver in a way that it can run on the QCentroid platform.
The easiest way to program your solvers is using Python.
Set up a clean environment#
When working locally, it is very useful to create a new environment (with VirtualEnv or Conda) to make sure you don’t have dependency mixes or you are not missing anything. Start with a completely new Python3.8 environment and add all the required modules in your requirements.txt file.
Create a Virtual Environment#
Virtual environments allow you to manage dependencies for different projects separately. To create a virtual environment, navigate to your desired project directory and run:
python -m venv myenv
Replace myenv with the name of your virtual environment.
Activate the Virtual Environment#
After creating the virtual environment, activate it:
.\myenv\Scripts\activate
source myenv/bin/activate
The terminal prompt will change to indicate that the virtual environment is active, you will see (myenv) at the begining of the command prompt.
You can check that you’re in a clean environment by listing the installed packages:
pip list
You should see no packages installed, just something like this, before installing the requirements of the solver:
Package    Version
---------- -------
pip        23.0.1
setuptools 65.5.0
To exit the virtual environment and return to normal system settings, use the deactivate command:
deactivate
After you issue this command, you’ll notice that the command prompt returns to normal.
You can activate the environment again at any time and it will be in the same status and with the same packages installed as the last time you left it.
Download the solver template#
The solver template contains the following files:
solver-name.md(solver documentation file)qcentroid.pyapp.pyrequirements.txt
solver-name.md (solver documentation file)#
It is required to have in the root of the repository a [solver-name].md file that contains the documentation you want to include about your solver, explaining, if any, the parameters that can be inserted by the end user.
Continuing with our example, we would have created MyFirstSolver.md:
    ## MyFirstSolver
    Test documentation associated with my solver.
    I don't have auxiliary parameters but I could define them like this:
    - "parameter1": (int) This is what my first parameter does.
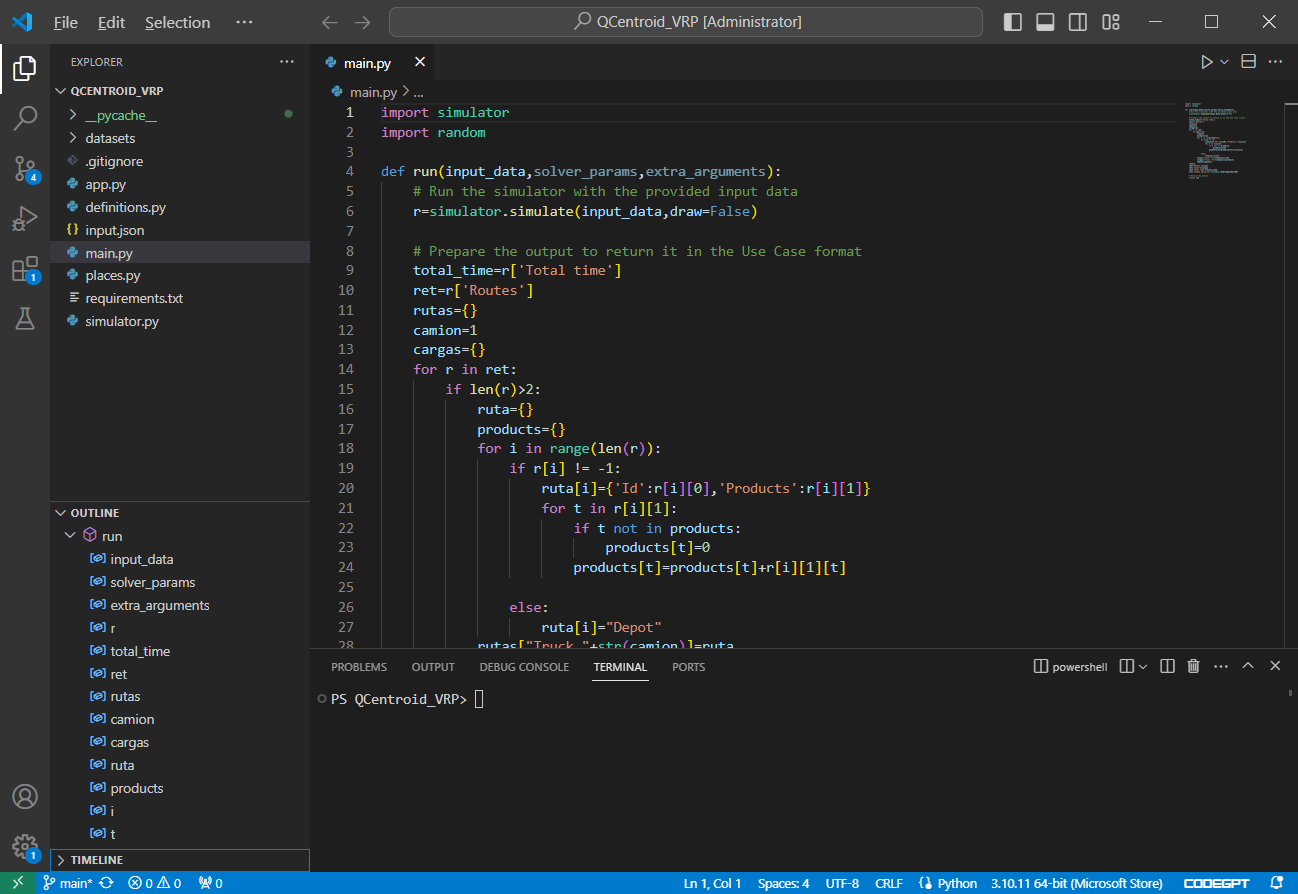
qcentroid.py#
This file will contain only a run function to which the parameters input_data, solver_params and extra_arguments will be passed:
import logging
logger = logging.getLogger("qcentroid-user-log")

from qiskit import QuantumCircuit, Aer, execute, IBMQ

def run(input_data, solver_params, extra_arguments):
    logger.info("Starting Solver...")

    # This is your solver's code

    size = int(input_data['size'])
    backend = Aer.get_backend('qasm_simulator')

    qc = QuantumCircuit(1)
    qc.h(0)
    qc.measure_all()

    job = execute(qc, backend=backend, shots=size, memory=True)
    individual_shots = job.result().get_memory()

    logger.info("Ending Solver...")
    shots = ''
    for i in individual_shots:
        shots += i

    output = {'shots': shots}
    # And this is the output it returns, which is a dictionary
    return output
app.py#
The purpose of this file is for local testing only. When executing your solver in the platform, it will be replaced with the platform’s own file that adds the necessary libraries and that calls the right hardward providers.
Caution
You should not modify this file to ensure that your solver works in both local and production environments.
As you can see in this, file the only thing it does is to call the function run() that we have in the qcentroid.py file.
input_file_name = "input.json"

# Input data loader. Container will get data from here

import json
with open(input_file_name) as f:
  dic = json.load(f)

# Optional extra parameters

if "extra_arguments" in dic:
    extra_arguments = dic['extra_arguments']
else:
    extra_arguments = {}

if "solver_params" in dic:
    solver_params = dic['solver_params']
else:
    solver_params = {}


import main
result = main.run(dic['data'], solver_params, extra_arguments)
print(result)
In order to run the solver locally without having to upload it to the platform, we can use a local JSON input file (input.json), something like this:
{
    "adj_matrix": [ [0, 9, 5, 2, 4, 1],
                    [9, 0, 3, 8, 7, 6],
                    [5, 3, 0, 2, 8, 4],
                    [2, 8, 2, 0, 9, 3],
                    [4, 7, 8, 9, 0, 2],
                    [1, 6, 4, 3, 2, 0] ],
    "num_nodes": 6
}
When executing the app.py it will open this input file, and pass the content to the run() funcion in the qcentroid.py file (see section below Run the solver locally).
requirements.txt#
Finally we have the requirements.txt file containing the packages used in the solver along with their versions:
qiskit==0.17.0
In your environment, you can install all the packages listed in the requirements.txt file using pip:
pip install -r requirements.txt
Any libraries from the standard approved ones in pip will be instaled. So make sure you add all your code dependencies (except for the Python standard libraries, such as json, logging or time).
On the other hand, if your project uses pyproject.toml, Pipfile, or another dependency manager, follow the respective instructions.
Modify the solver source code#
You will want to start modifying the template to create your own solver in the qcentroid.py file:
This file contains the run() function which is the entry point.
Installing additional requirements#
If you need to add new packages to your solver throughout the development process, we recommend that you add the new package to your requirements.txt file and after that, rerun the installation of the complete file:
pip install -r requirements.txt
This way, your requirements.txt file is up to date and ready for when you run your solver in the platform.
Handle exceptions#
Important
Do not catch exeptions globally in your solver. Let blocking exceptions to raise and to be handled by the platform for you, so the execution is stopped and the exception message is shown in the dashboard.
You can add limited scope exception handling in your solver code, but make sure to raise blocking errors as exceptions so the platform can capture them and stop the execution.
You can check this exceptions in the dashboard in the job details page after the execution.
Add logs to your solver#
You can add logs in your solver and see them in the platform web dashboard after every execution.
Tip
Add as many logs as you want, specially during the development, testing and experimentation phases to gather as much information as possible of your solver’s performance.
To do this, do the following in any of your solver files:
First, import Python’s native library for logging and initialize it:
import logging
logger = logging.getLogger("qcentroid-user-log")
Then, add as many log records as you want throughout your code:
logger.info("Starting solver execution...")
This is an example of a qcentroid.py file that includes log records:
import logging
logger = logging.getLogger("qcentroid-user-log")

def run(input_data, solver_params, extra_arguments):

    logger.info("Starting solver execution...")

    # This is your solver's code:

    input_param_1 = int(input_data['param_1'])

    logger.info(f"Input param_1: { input_param_1 }")

    output = {"output_param": "This is an output parameter"}

    # And this is the output it returns
    logger.info("End of solver execution.")

    return output
All these log records are stored and displayed in the web dashboard in the job details page, in the Execution logs section.
Measure execution time#
You can use this logging feature to measure your solver’s effective execution time by using the time library
Tip
You can measure the execution time of your solver or any subprocess within your solver.
Import Python’s native time library:
import time
Record the start and end time, substract them and send it to the execution log:
start_time = time.time()  # Start timing

# The process you want to measure

end_time = time.time()  # End timing

elapsed_time = end_time - start_time

logger.info(f"Elapsed time (in seconds): { elapsed_time }")
Run the solver locally#
To run your solver locally during the development process and before uploading it to the platform, just run the app Python script of the solver:
python app.py
Push the code to the repository#
When you have a working version of your solver, push the code to the Git repository.
git commit -a -m "The commit description."

git push
4. Connect your Git repository to the platform#
Now that you have your solver source code tracked in a repository, you can connect this repository to the platform. This is needed to allow the platform to access the source code to run it.
Important
Make sure to follow all the steps in the process below, specially step 3.d, where you have to go to your Git server (GitHub, for example) and add the Deploy Key provided by the Platform.
To connect a repository to the platform:
- Go to the section Solvers > Repositories through the left side menu
- Then, on the top-right corner, click on the Connect a new repository button.
- You will get the repository connection wizzard where you can do all the required steps:
- Select the solver which is hosted in this repository.
- Fill the repository information: name and SSH URL (valid SSH URL in your git server).
- Generate an SSH key pair to ensure controlled and secure access to your code.
- Go to your Git server: Your repository > Settings > Deploy keys and add the generated key.
- Click the Connect button at the end of the wizzard to complete the process.
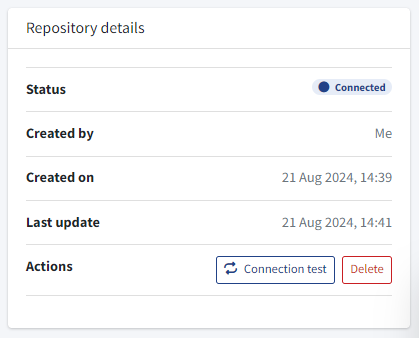
At this moment, your repository is connected and you just have to wait until this process finishes.
You will see your new repository marked as Connected when this is done.
5. Pull the new solver code#
Now that you have your solver source code tracked in a repository, you can Pull and build it into the plaform to be able to run jobs with it.
Go to the Repository details page via the left-side menu, and click the Pull button next to your solver.
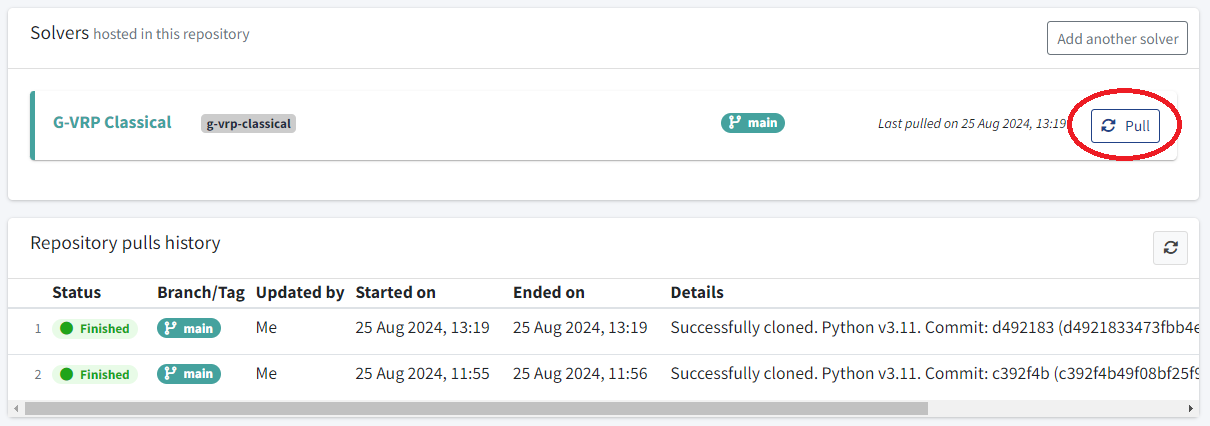
Below, you can check the pulls history. Just wait until this process is shown as Finished and make sure the commit pulled is the one that you just pushed to the Git server.
Now, your solver is ready to run jobs in the platform.
6. Run your solver in the platform#
The last step will be to run the solver that you just created in the platform.
Jump to the next article to see how to do this: